How to Format a Blog Post
This guide defines standards to ensure consistent formatting among Blog Posts created by different authors.
This guide assumes you’ve read the Creating Post Content For MOCs Guide and reviewed a few posts with high Quality Scores to observe how Classic-Pirates.com formats Blog Posts.
The Toolbars
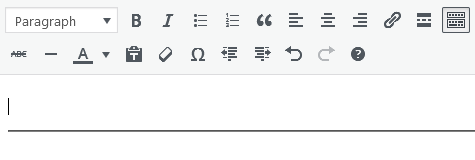
Classic-Pirates.com employs the Classic WordPress editor which has a similar interface to most Word Processing software, so you’ll find most of the formatting options in the toolbars above the editor.

By default only one row of the toolbar will be visible, so to reveal the second row, click the Toolbar Toggle button on the far-right of the first row.
The Buttons
If you move your mouse cursor over each button, a Tool Tip will appear displaying the purpose of that button.
Below, the buttons which you will be commonly using have been highlighted.
- Yellow indicates buttons which will be required for each Blog Post.
- Green indicates buttons which will be used occasionally.

The remaining buttons have not been highlighted because you do not need to:
- Change the text’s size or colour.
- Change the alignment of the text
- Indent the text
- Insert Special Characters
- Insert a Read More tag
Formatting
To change the text’s style, first highlight the text you wish to change and then select preferred styling from the corresponding Button or Dropdown in the Toolbar.
You will need to understand the following formatting options:
- Paragraphs
- Headings
- Bold & Italics
- Block Quotes
- Hyperlinks
- Dividers/Horizontal Lines
- Strikethrough
- Lists
- Paste As Text
- Clear Formatting
Paragraphs
Paragraph is the default text style and the bulk of your Post Content should be written in this style.

- Paragraphs should consist of 2-3 sentences.
- To start a new paragraph press Enter.
- Never create a Blog Post with one continuous paragraph! Always restructure the text so it forms paragraphs of 2-3 sentences.
Headings
All Headings should be formatted in the Heading 3 style and written in Title Case.
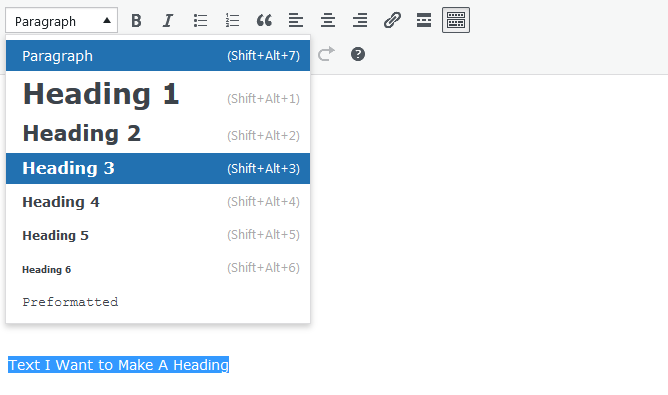
- When accessing the Text Style Dropdown the Headings 1 to 6 are available. Ignore these, to ensure consistency only select Heading 3.
- Do not format entire sentences or paragraphs in Heading 3.
- Aim to keep headings less than 6 words.
Bold and Italic Text

Bold can be used to highlight keywords and names, while Italics can be used to indicate titles.
For example:
Builder SpinX125 demonstrates this in "Bay of Lost Treasures"
- Don’t format entire sentences or paragraphs in Bold or Italic
- Limit formatting to individual keywords or the words which comprise the name or title.
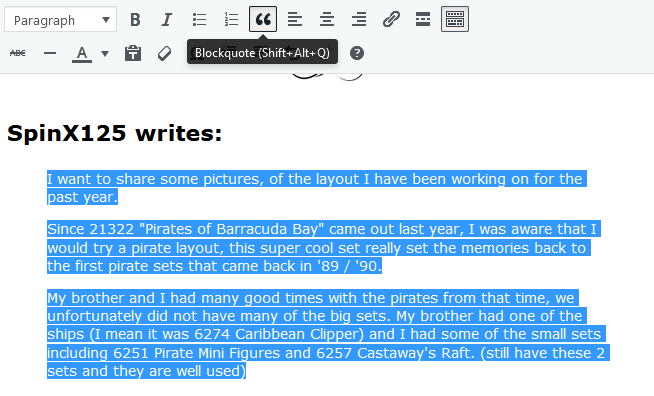
Block Quotes
A Block Quote will Indent and Italicize the selected text.

Use a Block Quote when you want to incorporate a passage of text written by someone else.
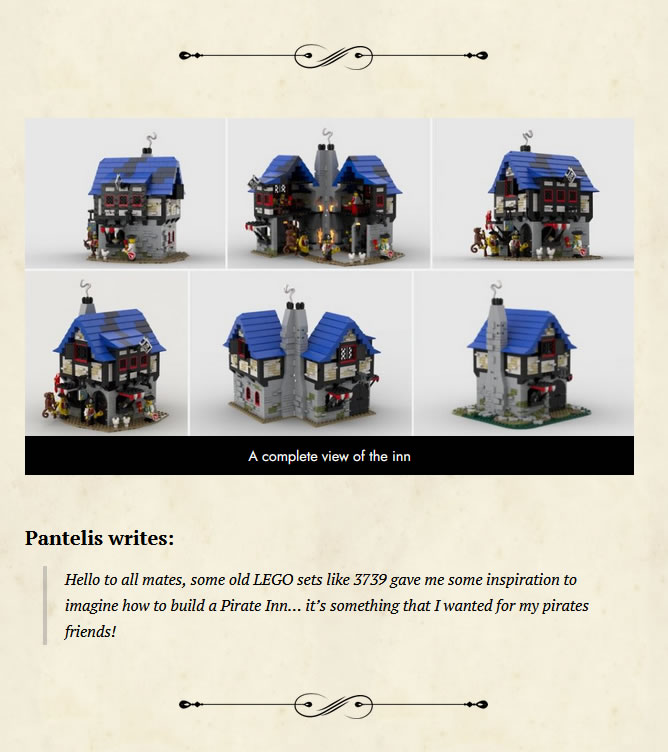
The most common use will be the content under a Builder writes: heading
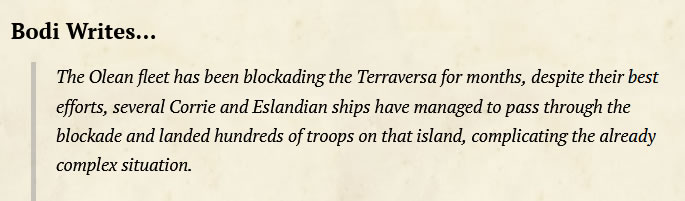
Observe the formatting of the text under the heading
Block Quotes don’t have to be limited to the text beneath Builder writes: heading and can be applied anywhere in the Blog Post you want to quote blocks of text from another source.
IMPORTANT!
- Ensure your Blog Post is not entirely quotes! Make an effort to write your own original content.
- You DO NOT need to format your Block Quoted text in Italics – this will be done automatically.
- If you’re just quoting a few words, DO NOT use a Block Quote. Instead, wrap the quoted text between Inverted Commas and use Italic formatting.For example:
"This is the text I'm quoting"
Removing Block Quotes
To remove a Block Quote, highlight the text with the Block Quote formatting and click the Blockquote button in the Toolbar.
IMPORTANT!
Ensure you highlight ALL the Block Quote text because any text that has not been highlighted will remain with the Block Quote formatting.
Hyperlinks
Hyperlinked text appears red and underlined. For example.

Hyperlinking to webpages both Internal (another webpage on Classic-Pirates.com) and External (webpages hosted on other websites) will necessary as you’ll need to reference information which has not been included within your Blog Post.
After you’ve highlighted the text you want to hyperlink and clicked the Insert/Edit Link button, there are two methods for applying a URL (I.e. link).

Method 1
If you’re linking to an Internal Webpage, type a keyword (or two) which can be found the Webpage’s Title into the URL Input Field and list of matching webpages will appear.
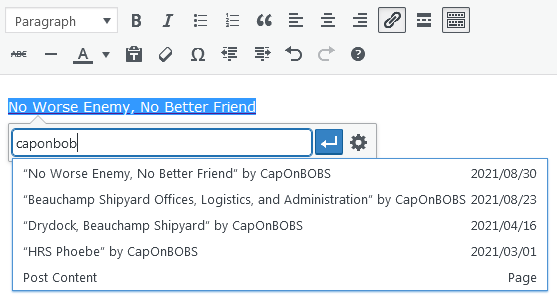
Click on the the Webpage Title corresponding to the webpage you want to link to.
Then click on the Apply Button (blue button with arrow).
Method 2
Paste the URL into the URL Input Field.
To do so, you will first need to Copy the URL for the webpage you want to link to.
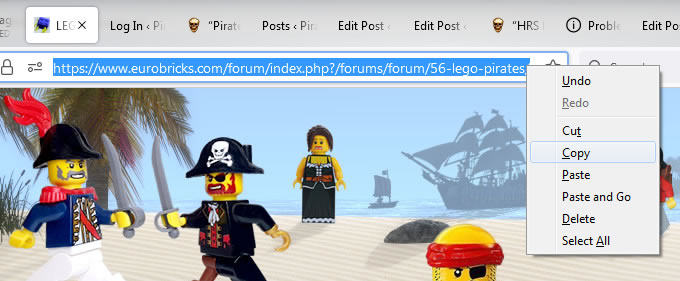
TIP: You can copy the URL directly from the Address Bar of your Web Browser
If you’re linking to an External Webpage, ensure the Open link in a new tab checkbox is selected.
To do so, after you’ve pasted the URL into the URL Input Field, click the Link options button.
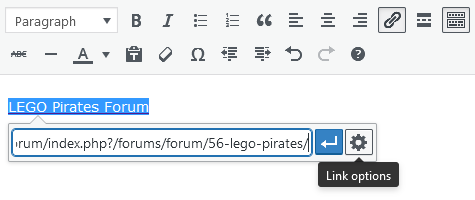
A popover will appear containing the Link Options.
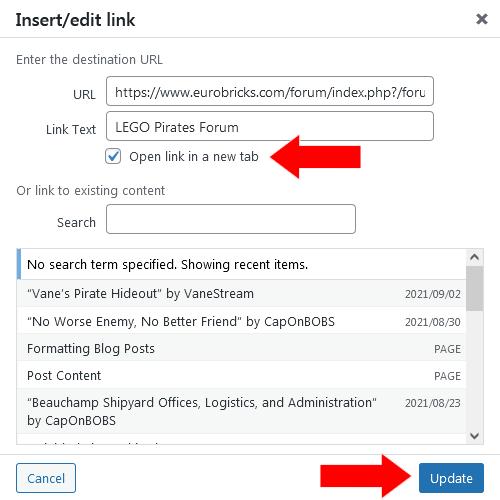
Ensure the Open link in a new tab checkbox is selected and then click the blue Update button.
Editing Hyperlinks
Sometimes you may need to update or correct an existing Hyperlink.
To do so, click on the intended Hyperlink and a Floating Toolbar will appear beneath.
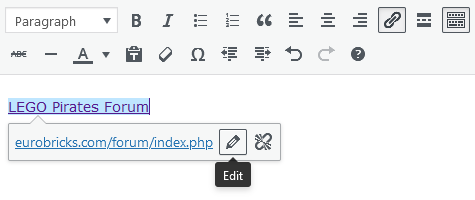
Click the Edit button and the URL Input Field will become available.
REMEMBER: click the Apply button once you have finished updating the URL or your changes will not be applied.
Removing Hyperlinks
Occasionally you may need to complete remove a Hyperlink.
To do so, click on the Hyperlink you want to remove and a Floating Toolbar will appear beneath.
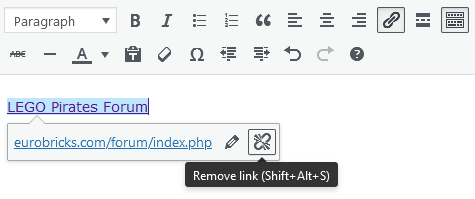
Click the Remove link button and the text will no longer be hyperlinked.
Dividers (aka Horizontal Lines)
Dividers are decorations which are used to add neutral space between the sections of a Blog Post.
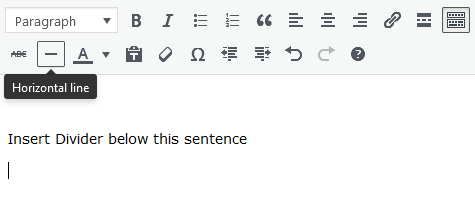
Inserting Dividers
To insert a Divider, position the the Caret (the flashing vertical bar) in the position in which you want the Divider to appear and then click the Horizontal line button in the Toolbar.
Example of Dividers in Use
IMPORTANT!
Use Dividers sparingly and place them strategically where it makes sense to insert some space.
DO NOT insert them for the sake of inserting them!
Removing Dividers
Position the Caret above the Divider you wish to remove and press the Delete button on your keyboard.
You may need to press the Delete button twice before the Divider is removed.
Strikethrough
This formatting draws a line through text.

For example:
Text formatted with Strikethrough
Strikethrough is sometimes used in Classic-Pirates.com Blog Posts to conceal facetious or sarcastic remarks without interrupting the prose or overall narrative.
For example:
Those who don't know how to use Strikethrough are bleedin' fools still learning the art of blogging.
IMPORTANT!
Use Strikethrough very sparingly. Never format entire sentences or paragraphs with Strikethrough and limit its use to less than 4 words.
Lists
On occasion it may be necessary to present information in a List.
This occurs when you find existing content which is already in list format, or you have a series of items which work better as a list, rather than short sentences.

Lists are available in two varieties, Bulleted and Numbered.
Select the type of List most appropriate for the items you are listing.
Generally you’ll use Bulleted Lists, however if you want to count each item, (E.g. “Top 5 MOC Highlights“) you’d use a Numbered List.
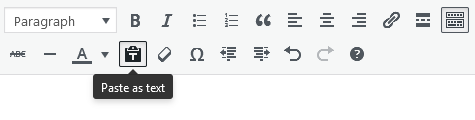
Paste As Text
When pasting text from an external source which already has formatting, the Paste As Text tool will allow you to the paste plain text without the formatting.
This is particularly useful for avoiding introducing unwanted formatting into your Blog Post.
Remember this is a Toggle button meaning its functionality is activated upon clicking and deactivated by clicking a second time.
When it is active the button will appear “pressed” in the Toolbar.
Clear Formatting
Sometimes it may be necessary to remove formatting which you’ve already applied.
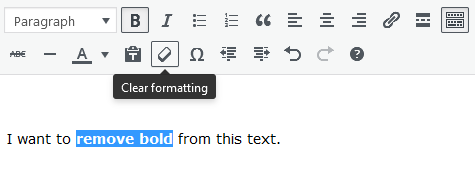
Highlight the text which you want to remove the formatting and click the Clear formatting button.
IMPORTANT!
This will not remove the Heading 3 style and return text back to the Paragraph style. To do so, you will need to change